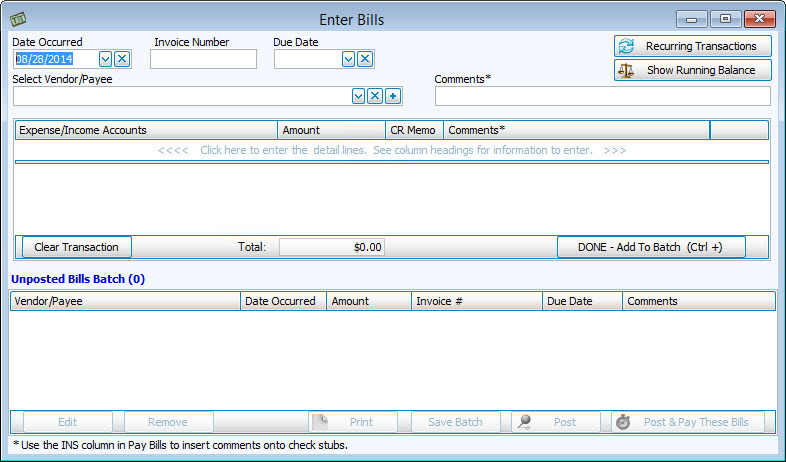
Enter Bills
When your Church receives a bill, use the Enter Bills screen to enter it in the Church Windows software. If your Church plans to pay the bill after having entered it, you can use the Enter Bills screen to then access the Pay Bills screen and process the bill payment.
To access the Enter Bills screen:
- From The Initial Portal of Church Windows choose Accounting then either:
- Click Transactions in the Button Bar at the top of the screen, then click Enter Bills
- Click on the Enter Bills button in the of the Accounting Module
OR
If you have set up Recurring Transactions to reuse in your transaction screens, click the button to open the screen and apply the transaction to your batch. While entering transactions, you can click the Show Running Balances button to do so for the items added to the batch.
- If necessary, change the Date Occurred box to the desired date.
- Enter the Invoice Number and the Due Date for the invoice in their respective boxes, as applicable.
- Select Vendor / Payee receiving the bill from the dropdown box.
- Type any Comments you wish to store with the transaction itself. The comments entered here will show up on your Church Windows Accounting reports as Transaction Comments.
- <<<< Click here to enter the detail lines. See column headings for information to enter. >>>>
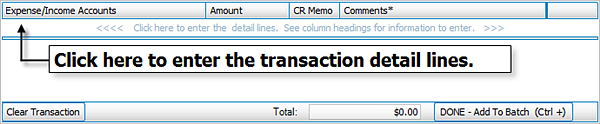
Click in the line to begin entering the information for the Bill:- Choose the desired Expense / Income Accounts
- Enter the Amount
- Add any necessary Comments. The comments entered on each detail line will show up on your Church Windows Accounting reports as Line Item Comments.
Note:
Comments entered on this screen will not appear on the check stubs. - If the line item represents a credit being made back to the recipient of the bill, click the CR Memo box to place a
 checkmark in the box. With the CR Memo box checked, the Total for the transaction will be reduced by the Amount in the line item.
 - When finished with the detail line, click the
 Add button to add the line item.
 - If the transaction you are entering contains additional components that are part of a whole transaction, click the next line and enter the line item.
- Click the
 Delete button to remove the line or the
  Undo button to discard changes without saving.
- When finished with all detail lines, click the DONE — Add To Batch (CTRL +) button.
Repeat these steps for every transaction until all your batch items have accumulated in the Unposted Bills Batch list. You can make changes to, or remove any batch item. After you first click on the desired item, click either Edit to make changes or Remove to discard it.
Click the button to Save the batch for use at a later time, and/or Print to print a listing of the items. To finalize the posting of your batch items, click the button to Post or Post & Pay These Bills. The automatically generated transaction number and the total dollar amount for the batch will display in a message asking you one last time if you wish to print the batch. Answer by clicking Yes or No.
Note:
Clicking the Post & Pay These Bills button brings up the Pay Bills screen after the work is done on the Enter Bills screen.
Use the transaction number(s) in the message to look up the posted transaction(s) on the Browse Transactions screen. Each transaction item in the batch will appear as a BILL transaction.
